
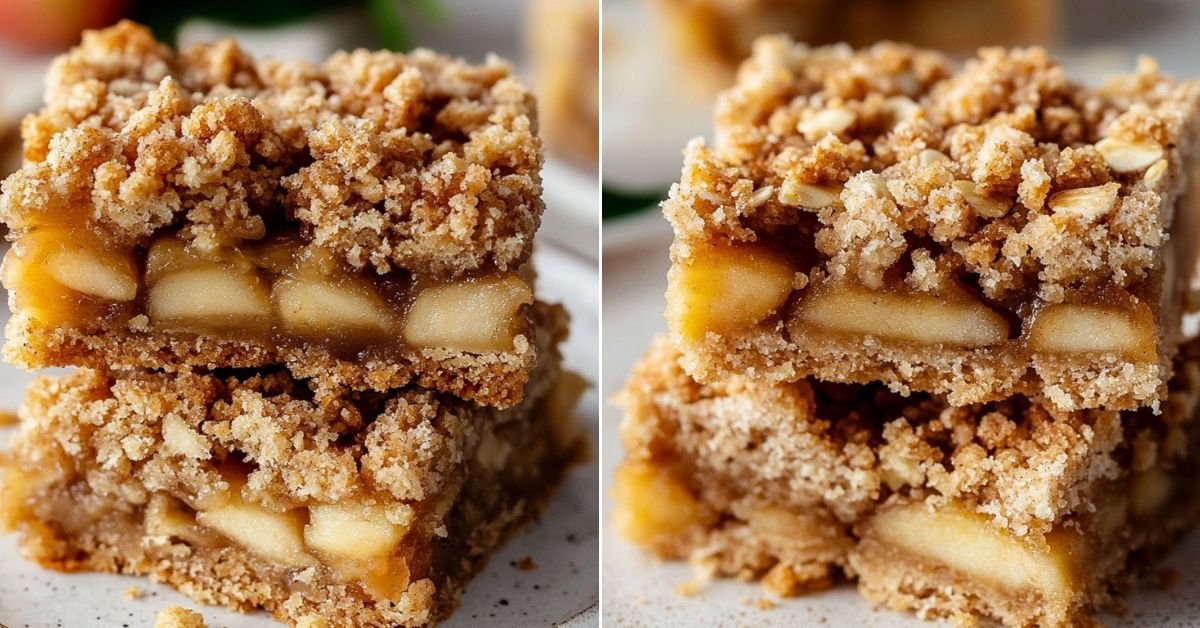
This sweet little tray of apple crisp bars is pure nostalgia, packed into golden, buttery squares. They’ve got that cozy vibe that reminds me of autumn walks, wind-tousled hair, and the smell of cinnamon clinging to your sweater sleeves. I started baking these on a whim one chilly Sunday when the only fruit in the house was a lone bag of apples giving me the side-eye. A few pantry staples, a quick oat streusel, and suddenly, my kitchen smelled better than any fancy candle ever could. You don’t need a PhD in pastry to make these either. Just a mixing bowl, a baking dish, and a little faith in the magic of warm dessert. They’re sturdy enough to pick up like a cookie but soft enough to make you grab a second. Whether you’re more of a ‘cheesey potatoes for dinner’ person or someone always hunting for ‘air fryer cookies’ ideas, this bar is your next sweet obsession.

Table of Contents
- 1) Key Takeaways
- 2) Easy Apple Crisp Bars Recipe
- 3) Ingredients for Apple Crisp Bars
- 4) How to Make Apple Crisp Bars
- 5) Tips for Making Apple Crisp Bars
- 6) Making Apple Crisp Bars Ahead of Time
- 7) Storing Leftover Apple Crisp Bars
- 8) Try these Desserts next!
- 9) Apple Crisp Bars
- 10) Nutrition
1) Key Takeaways
- You don’t need to be a pastry expert to whip these up
- Perfect for fall, but honestly good any day of the year
- They can be made ahead and hold up well for a few days
- Great base for customizing with different fruits
2) Easy Apple Crisp Bars Recipe
Let’s be real, sometimes we just want a dessert that delivers all the warmth and comfort of homemade apple pie but doesn’t require hours of prep. These sweet bars are that shortcut. The oat crust and crumble topping? Golden and buttery. The apple filling? Juicy with just enough cinnamon to give it that cozy holiday feel.
I make these when I want my kitchen to smell like I’ve been baking all day, even though it only took around 15 minutes to throw together. That’s the kind of magic this dessert brings. And honestly, every time I make it, someone asks for the recipe—usually with their mouth full.
If you love things like cheesey potatoes or air fryer cookies, you’ll get why this kind of simple, rustic sweet just hits right. Whether you serve them warm with a scoop of vanilla ice cream or eat them straight out of the pan (no judgment), these bars don’t disappoint.

3) Ingredients for Apple Crisp Bars
1 cup unsalted butter, melted: This is what gives the crust that perfect, rich base. Don’t use margarine. Just trust me.
1 cup brown sugar, packed: Adds that deep, molasses-y sweetness that pairs so well with apples and cinnamon.
2 cups all-purpose flour: Helps everything bind together. I’ve tried using almond flour once… let’s not talk about that.
2 cups old-fashioned oats: Adds chew and texture. These oats make the crumble topping sing.
1/2 tsp baking soda: Just a touch to help lighten the mix a bit.
1/4 tsp salt: It may seem small, but this pinch of salt makes the sweet pop.
2 cups apple pie filling: Store-bought works if you’re short on time. Homemade makes you feel a little more like a kitchen hero.
1/2 tsp ground cinnamon: Warm, familiar, and what gives these bars their “fall in a bite” flavor.

4) How to Make Apple Crisp Bars
Step 1. Preheat your oven to 350°F and line a 9×13-inch pan with parchment paper. This is non-negotiable if you want clean bar edges.
Step 2. Mix the melted butter, brown sugar, oats, flour, baking soda, and salt in a large bowl. You’ll want a crumbly mixture that holds together when pressed.
Step 3. Press about two-thirds of the mix into the bottom of your pan. No need to be perfect. Rustic is the name of the game.
Step 4. Spread the apple pie filling evenly across the crust. This is where your sweet layers start taking shape.
Step 5. Sprinkle cinnamon across the apples. That little extra touch changes everything.
Step 6. Crumble the rest of your oat mixture on top. Try not to eat it straight from the bowl (but if you do, I won’t tell).
Step 7. Bake for about 30 to 35 minutes or until the top is golden and your kitchen smells like pure autumn joy.

5) Tips for Making Apple Crisp Bars
Let the bars cool completely before slicing. I know, it’s hard. But you’ll get cleaner cuts and fewer regrets.
If you want a deeper flavor, toast the oats before mixing them into the crust. It adds a nutty, rich note that really plays well with the apple filling.
Try adding a little lemon zest to the apple mixture if you’re making it from scratch. It brightens everything and makes the sweet flavor pop.
6) Making Apple Crisp Bars Ahead of Time
This is one of those sweet recipes that actually improves with time. The crust firms up just a bit, and the flavors settle in nicely overnight.
If you’re baking for a party or meal prep situation, these bars are your best friend. Make them a day early, wrap the pan, and just wait for compliments to roll in.
You can even freeze them. Just cut them into bars and freeze between layers of parchment. Pop them in a warm oven for 10 minutes and they’re back in action.
7) Storing Leftover Apple Crisp Bars
Keep these in an airtight container at room temp for up to 3 days. That’s if they even last that long.
If your house runs warm, store them in the fridge. They’ll stay firmer and still taste great straight from the cold.
Want that fresh-baked feeling again? A few seconds in the microwave brings the sweet filling back to life.
8) Try these Desserts next!
9) Apple Crisp Bars

Apple Crisp Bars – A Sweet Fall Favorite You’ll Crave All Year
Ingredients
- 1 cup unsalted butter, melted
- 1 cup brown sugar, packed
- 2 cups all-purpose flour
- 2 cups old-fashioned oats
- 1/2 tsp baking soda
- 1/4 tsp salt
- 2 cups apple pie filling (or homemade cooked apples)
- 1/2 tsp ground cinnamon
Instructions
- Preheat your oven to 350°F (175°C) and line a 9×13-inch baking pan with parchment paper.
- In a large bowl, mix melted butter, brown sugar, flour, oats, baking soda, and salt until crumbly.
- Press about 2/3 of the mixture into the bottom of the prepared pan.
- Spread the apple pie filling evenly on top, then sprinkle with cinnamon.
- Crumble the remaining oat mixture over the apples.
- Bake for 30–35 minutes or until the top is golden brown and your kitchen smells like heaven.
- Cool completely before slicing into bars—or don’t, and embrace the warm gooey chaos!
10) Nutrition
Serving Size: 1 bar, Calories: 287, Sugar: 18g, Sodium: 78mg, Fat: 14g, Saturated Fat: 8g, Carbohydrates: 38g, Fiber: 2g, Protein: 3g, Cholesterol: 32mg


Leave a Comment