

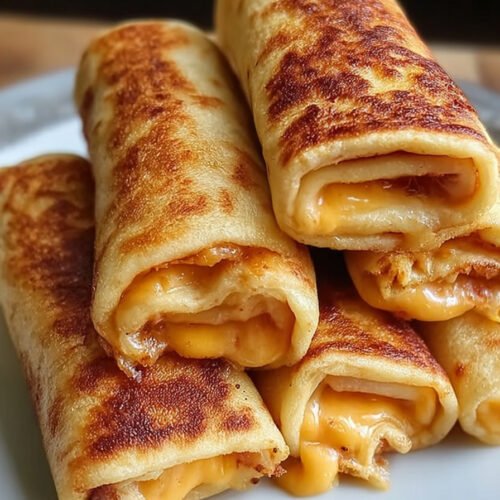
If you thought grilled cheese was good, wait until you try these grilled cheese roll ups! They’re crispy, melty, and irresistibly fun. Imagine rolling up your favorite comfort food into a bite-sized snack that’s perfect for dunking into your tomato soup or enjoying on its own. And let’s be real – who doesn’t love a cheesy, crispy, golden crunch? These little roll ups are the perfect snack for when you need something quick and satisfying, but don’t want to settle for a boring sandwich. Plus, you can even sneak in some extra veggies if you’re feeling fancy! So, grab your bread, butter, and cheese, and let’s get rolling.

Table of Contents
- 1) Key Takeaways
- 2) Easy Grilled Cheese Roll Ups Recipe
- 3) Ingredients for Grilled Cheese Roll Ups
- 4) How to Make Grilled Cheese Roll Ups
- 5) Tips for Making Grilled Cheese Roll Ups
- 6) Making Grilled Cheese Roll Ups Ahead of Time
- 7) Storing Leftover Grilled Cheese Roll Ups
- 8) Try these snacks next!
- 9) Grilled Cheese Roll Ups
- 10) Nutrition
1) Key Takeaways
- Grilled cheese roll ups are a fun twist on the classic comfort food.
- They’re quick, easy to make, and perfect for dipping in tomato soup!
- Just a few simple ingredients and steps to get a crispy, cheesy treat.
- Ideal for kids and adults alike – who doesn’t love cheese and bread?
- Leftovers can be stored and enjoyed later (if they last that long!).

2) Easy Grilled Cheese Roll Ups Recipe
Who doesn’t love a grilled cheese sandwich, right? But what if I told you we could take that same cheesy goodness, roll it up, and make it crispy all over? Yep, that’s right. Grilled cheese roll ups are exactly what they sound like—bread and melty cheese rolled into a bite-sized snack that’s pure magic on a plate.
They’re quick, easy, and the perfect excuse to enjoy a gooey grilled cheese any time you’re craving comfort food. Whether you’re serving them up for lunch, an after-school snack, or as a finger food at your next gathering, these roll ups are bound to impress. They’re basically mini grilled cheese sandwiches that are perfectly crispy all around.
Ready to dive into the crispy, cheesy world of grilled cheese roll ups? Let’s get cooking!

3) Ingredients for Grilled Cheese Roll Ups
Bread: This is the base of our roll ups, and you want a good, sturdy bread that holds its shape when rolled. I recommend something like a classic white bread or even whole wheat if you’re feeling a bit healthier. The bread needs to be thin enough to roll but strong enough to hold all that melty cheese inside. If you use thicker bread, the rolls might be a bit tough to handle.
Cheese: The star of the show! Any cheese that melts well will work, but my go-to is a nice, sharp cheddar. It gives a little tang and melts beautifully. You can use other cheeses like mozzarella, American, or even a blend of cheeses for extra gooeyness. Feel free to mix it up and experiment with your favorites!
Butter: To get that golden, crispy crust, you’ll want to spread a thin layer of butter on the outside of each roll before grilling. This is the key to making them extra crispy, so don’t skip this step! Butter also adds richness and flavor, making the whole thing taste like it came from your favorite diner.

4) How to Make Grilled Cheese Roll Ups
Step 1: Start by prepping your bread. Lay out each slice and carefully remove the crusts. This makes rolling the bread easier and helps it hold its shape better when cooked.
Step 2: Place a slice of cheese on each piece of bread. You can layer the cheese if you like it extra cheesy, or just go with one slice for a more moderate amount of melt. Roll each piece of bread tightly so the cheese is wrapped snugly inside.
Step 3: Heat up a non-stick skillet or griddle over medium heat. While that’s warming up, spread a thin layer of butter on the outside of each roll-up. This is going to give them that crispy golden texture we all love.
Step 4: Once the skillet is hot, add the rolls, buttered side down. Let them cook for a few minutes, turning them as needed to make sure they’re golden and crispy on all sides. Keep an eye on them so they don’t burn – you want that perfect crispy outside with the melty cheese inside.
Step 5: When the roll ups are golden brown and delicious, remove them from the skillet and let them cool for a minute before serving. You can slice them into smaller pieces if you’re sharing, or just dive in as is. Either way, they’re going to disappear fast!
5) Tips for Making Grilled Cheese Roll Ups
Use Soft Bread: Make sure your bread is soft enough to roll up without cracking. If the bread feels a little too firm, you can give it a quick 10-second zap in the microwave to soften it up before rolling.
Don’t Overstuff: As tempting as it is, don’t go overboard with the cheese. If you put too much inside, it can spill out while cooking, making a mess in your skillet. Keep it simple, and let the cheese melt naturally into the bread.
Perfect Heat: Medium heat is your friend here. Too high, and you risk burning the bread before the cheese melts. Too low, and you’ll end up with soggy rolls. It’s all about that perfect balance of crispy and gooey.
6) Making Grilled Cheese Roll Ups Ahead of Time
If you want to prep these roll ups ahead of time, you totally can! Simply roll up the bread and cheese, then wrap each roll in plastic wrap or foil. Store them in the fridge for up to a day before you plan to cook them. When you’re ready to eat, just pop them in the skillet for a few minutes until they’re crispy and hot.
This makes them perfect for meal prepping or busy weeknights when you just want something fast and cheesy. You can even freeze them for longer storage and reheat them whenever the craving strikes!
Prepping them ahead of time is also great for parties or gatherings. You can get everything ready the day before, then just cook them up when it’s time to eat. They’ll be a hit with everyone.
7) Storing Leftover Grilled Cheese Roll Ups
Leftovers? If you’re lucky enough to have any, storing grilled cheese roll ups is super simple. Just place them in an airtight container and store them in the fridge for up to 3 days. When you’re ready to enjoy them again, simply reheat in a skillet over medium heat or pop them in the oven to get them crispy once more. Trust me, they taste just as good the second time around!
If you want to freeze them for later, you can wrap each roll in foil and freeze for up to a month. When you’re ready to eat, bake them at 375°F until they’re heated through and crispy.
The key here is to reheat them gently. You don’t want to overdo it and risk losing that delicious crispy texture. A quick heat-up, and you’re good to go!
8) Try these snacks next!
9) Grilled Cheese Roll Ups
Grilled Cheese Roll Ups Sandwich Recipes
Ingredients
For the Roll Ups
- 4 slices of bread
- 4 slices of cheese (cheddar, American, or your favorite type)
- Butter (enough to spread on the bread)
For the Dipping Sauce
- 1 cup tomato soup (or your favorite dipping sauce)
Instructions
Step 1
- Preheat your griddle or skillet over medium heat.
Step 2
- While the skillet is heating up
- butter one side of each slice of bread.
Step 3
- Place a slice of cheese in the center of each piece of bread
- then roll the bread up like a little log.
Step 4
- Place the rolls in the skillet
- buttered side down
- and cook until golden and crispy on all sides. You can turn them gently to ensure they cook evenly.
Step 5
- While the roll ups are cooking
- heat up your dipping sauce (tomato soup is classic!).
Step 6
- Once the roll ups are golden and crispy
- serve them with a nice warm bowl of soup and enjoy the crunch.
10) Nutrition
Serving Size: 1 roll up | Calories: 150 | Sugar: 2g | Sodium: 300mg | Fat: 10g | Saturated Fat: 5g | Carbohydrates: 15g | Fiber: 1g | Protein: 6g | Cholesterol: 25mg


Leave a Comment